Deploying a Spring Boot Application using Docker in Linux Environment

Through this project it shows how to deploy a Spring Boot project in Docker with following Docker Hub. Before deploying the project we should have the below pre-requirements.
Pre-Requirements that needed to follow
- Install Docker in the Linux system.
Follow the link mentioned to install docker engine on Ubantu
2. Create an account in Docker Hub
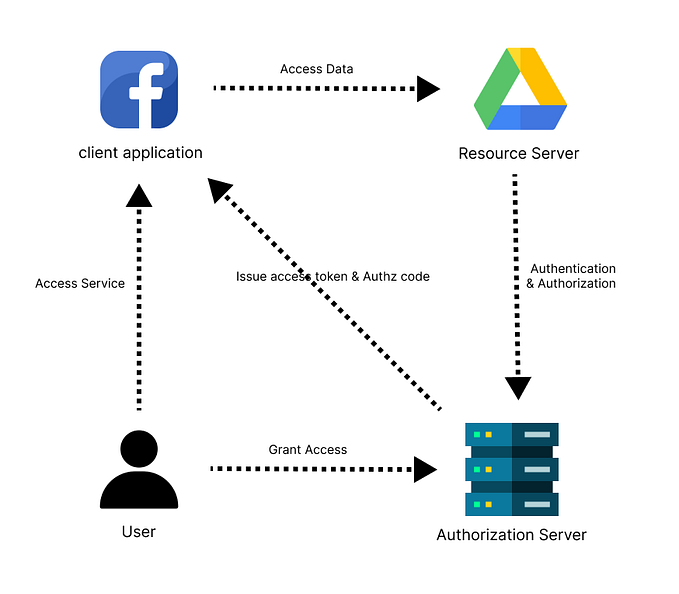
Overview Diagram

Local Setup of Spring Boot Application

First create a sample project
Use CTRL + shift + p to create a Spring boot application

Add following dependencies
Spring Web, Spring Boot DevTools, Spring Boot Actuator, Lombok, Thympleaf
Set the spring boot version as latest and select java as language
Set packing type as jar and set java version you preferred.
Then create the project

Create a html file and add a text in the body (Between body tags)
For now I name the html file as “index.html”. And add a text in the html file
<!DOCTYPE html>
<html lang="en" xmlns:layout="http://www.ultraq.net.nz/thymeleaf/layout"
      xmlns:th="http://www.thymeleaf.org">
<head>
    <meta content="text/html; charset=UTF-8" http-equiv="Content-Type"/>
    <meta content="width=1024" name="viewport"/>
    <meta content="no-cache, no-store, must-revalidate" http-equiv="Cache-Control"/>
    <title>Hello Dockerized Spring Boot</title>
</head>
<body>
    <h1>Hello Dockerized Spring Boot</h1>
    <h2> Testing Project </h2>
</body>
</html>Create a Controller class and add a end point to it
package com.example.sampleproject1.sampleproject;

import org.springframework.stereotype.Controller;
import org.springframework.web.bind.annotation.GetMapping;

@Controller
public class TestingController {

    @GetMapping("/testing")
    public String index() {
        return "index";
    }
}
Create a DockerFile and add the below commands
Here we create the DockerFile create the file in Root Folder of the Project.

Commands
# Use an official OpenJDK runtime as a parent image
FROM openjdk:17-jdk-slim

# Set the working directory to /app
WORKDIR /app

# Copy the packaged JAR file into the container at /app
COPY target/sampleproject-*.jar app.jar

# Make port 8080 available to the world outside this container
EXPOSE 8080

# Run the JAR file
CMD ["java", "-jar", "app.jar"]
Then the Build the Project locally using below command
mvn clean installNow local setup is over. Now need to create the docker setup
Dockerizing the Spring Boot Application

Then Create the Docker Image using below command
docker build -t salitha-new-image3 .To check whether the image is create or not use the below command and you can see the created image
Docker images
If you want to run the application by creating the container without redirecting to Docker Hub you can use the below command
docker run --name salitha-new-container1 -p 8081:8080 -d salitha-new-image3You can see in the below picture that Dockerized Spring Boot Project running in localhost 8081

To check the running containers use the below command
Docker ps -a
To stop the running container use the 1st command mentioned below and to remove the container use the 2nd command
stop the container: docker stop fb1d
(fb1d means the container Id of container that is running)

remove the container: docker rm fb1d
After creating the image we can push the image to Docker Hub. For that first we have to login to the Docker Hub using below command
We have to configure the Docker Hub credentials for the machine early. When we enter the below command first time we get to enter username and password we gave for docker hub and through that we can login to the Docker Hub
docker loginThrough below commands we can push the docker image to the Docker Hub
docker tag salitha-new-image3:latest salitha12345/salitha-new-image3-1:1

docker push salitha12345/salitha-new-image3-1:1
From below images you can see the docker container in Docker Hub and image and the tags


Then from below command we can pull the image from Docker Hub
docker pull salitha12345/salitha-new-image3-1:1From the below command you run the application again
docker run -d --name salitha-testing-image-container-2 -p 8082:8080 salitha12345/salitha-new-image3-1:1Below the application that running in localhost 8082 port